
There are countless 3D printed Master Swords out there for you to choose from, but if you want a way to display it you should be looking at this pedestal with two different versions of a light up Triforce.
Maker David Robinson started this project after printing out this version of the sword to sell to a friend. Robinson wanted to package it with a some kind of stand, and began work on this idea.
The modelling work began in 3ds Max with the base taking inspiration from the stone version in Breath of the Wild. The sword’s model was used here to make sure everything fit – the blade tip needed to slot into the base and the hilt cradled at the top.
The model was then moved into Fusion 360 to do the more complex parts before being exported to Simplify3D to slice the parts and prep them for printing.
The entire design process took upwards of 60 hours due to Robinson’s inexperience with the software, but note that this time does include prototyping.
Printing on the Cocoon Create Touch took around 150 hours, with all the parts at 0.3mm layer height to minimise print times. Most parts were done at 20-25% infill, save for the stand pegs and the Triforce lenses.
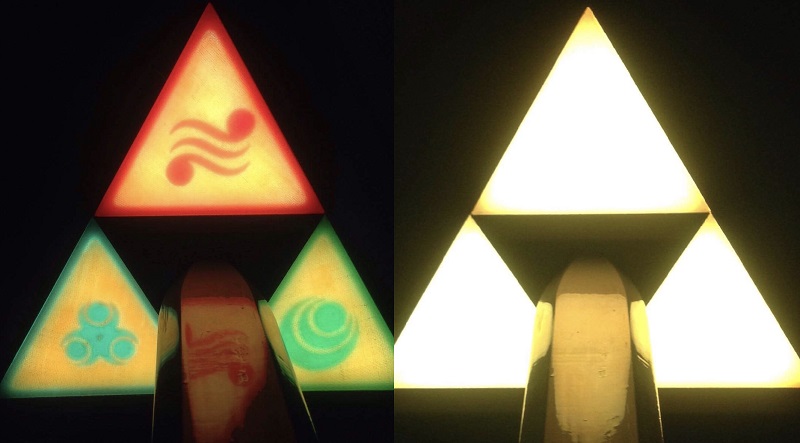
These were done at 100% as the pegs need to support the weight of the sword, and the light shining through the lenses would produce a honeycomb pattern if there was less infill.
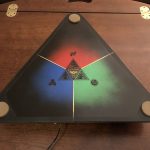
This print has six of these lenses which form two separate Triforces at the base of the pedestal – one all-yellow version for the traditional glowing look, and another that features the symbols for power, wisdom and courage.
35 centimetres of RGB LED strips are hidden beneath the lenses to provide the light. These are activated by a switch in the centre of the base that the sword rests on.


The sword can be moved slightly to turn the LEDs off, or another switch at the back will do the job. That being said, the low heat and power requirements of the lighting mean that you can leave it on for as long as you like. It’s powered by a wall outlet so you don’t need to worry about running a battery dry either.
The 46 separate printed parts around the electronics were joined together with epoxy, and putty was used to fill in gaps.
A lot of sanding went into making everything smooth – an electric sander, Dremel and hand sanding were all used here.
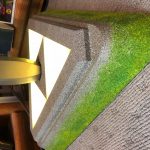
Painting was similarly involved, especially to get the look on stone on the base. Dulux’s granite effect spray paints created the effect along with a bit for brown thrown in too. PVC glue and various shades of green flock add moss right at the bottom.
Under the base there’s a thin sheet of MDF with a decal to show the correct placement of the lenses when the yellow option is not chosen.
This panel also helps keep the electronics safe, and provides a solid platform for the feet.
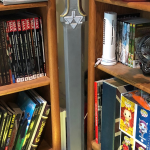
The last non-printed part is a wooden dowel that forms the neck for the stand. It has heatshrink tubing which give it a rubber feel and an interesting pattern.
The size of this part depends on the scale of your Master Sword, but this project is 90 centimetres tall with it attached, growing to 114 centimetres with the sword on it.
If you have everything else mentioned, all you need to make the pedestal now is the free files available from Thingiverse. The base, which is the biggest printed part, measures in at 42 X 37.5 X 7 centimetres when assembled, so have the necessary amount of filament on hand.


