

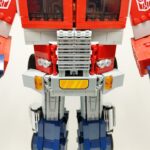
LEGO set 10302 is a feat of toy engineering offering buyers an Optimus Prime that they can build and then transform between robot and vehicle modes by twisting and turning like a regular Transformers toy without the need to take any bricks apart and rebuild.
Well that last part isn’t entirely true. There are two sticker pieces in the box of the set which are meant to be be switched when you go between the two modes.
This involves actually removing a section Optimus Prime’s “belt” / the front bumper of the truck.
You can see this right at the end of the instructions for the transformation. The orange sticker is intended for the robot mode while the all-grey one is for the vehicle mode.

In the Transformers fandom this kind of move is called “Partsforming” or, coincidentally, “LEGO-forming”.
It’s usually looked down upon as a kind of shortcut to pull off a transformation that simply can’t be done otherwise.
For this version of Optimus Prime, which already does so much not thought possible with LEGO, this may be accepted as a small concession and after paying for the set myself and building it I can attest that it’s really not a big deal.
But life can always be better and the spirit of LEGO is freedom to build what you want, so I have spent the last short while putting together a redesign of the belt / bumper that can flip between the two stickers without the need to remove any parts.
And well you’re reading this story so I have had some success.
You can see the finished redesign in this video swapping to the correct side while in vehicle mode. This custom assembly also doesn’t get in the way of any of the other steps of the transformation process.
So how did we get here? The first challenge of this build was making the two sticker pieces face opposite each other so a simple flip would reveal the other design.
This is harder than it seems due to the fact that LEGO is, usually, not designed to create builds like this. LEGO is a system focused on building upwards with the sides and bottom of a structure usually ignored.
Over the decades LEGO has slowly introduced specific pieces to work around this and the community has many of its own techniques too.
Unfortunately these solutions weren’t too useful for this application as keeping the new belt / bumper slim was a priority. Many simple to implement solutions exist but all made the prototype designs noticeably too thick.
Thankfully I found salvation in the form of the piece Plate, Modified 1 x 1 with Light Attachment that was the answer to attaching the two sticker pieces together.
To allow the swivel between the two sides a small and simple ball and socket joint did the trick.
The final hurdle was the two “winglets” on each side of the belt / bumper. The original build has these on hinges so they can turn slightly to fit either robot or vehicle mode and that had to be maintained in the redesign.
Again the problem of thickness reared its head as it was again easy to mirror this design on each side, but making something too thick would prevent the hinges from moving.
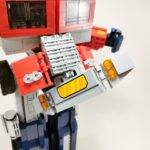


To solve this the winglets were moved out horizontally ever so slightly. Their builds look good thanks to some anti-stud tile pieces that are relatively new in the LEGO world. If this was made a few years ago this solution would either be impossible or it would not look as good.
For those who want to replicate my work I am not going to leave you in the deep end to reverse engineer what I have done.
Instead I have created a parts list and full instructions to do this yourself.
These are available completely for free on Rebrickable here.
You will need to buy – or salvage from your collection – just 41 extra pieces to make this redesign.
The original belt / bumper uses mainly light bluish grey pieces but also has some dark bluish grey and black in there too.
Instead of following these colours exactly I went with all light bluish grey pieces which, I think, looks more like a solid chunk of metal which is appropriate for a truck bumper.
The sole exception is one half of the ball and socket joint which is in dark bluish grey. This is one of the “colour locked” pieces which LEGO simply doesn’t make any any other colour.
I’ve also embedded the instructions below to give you a quick look at the process. On top of this you will also need to make a slight change to the grill on Optimus Prime. It’s a simple swap changing out two pieces for two other pieces.

